Mobile push notifications can be an effective way to grab attention and share important information.
Don’t want your customer relationships to end with their first purchase? You need a way to connect with them beyond your email campaigns or in-app messages.
That’s where mobile push notifications come in. These short messages instantly attract users' attention, always keeping your brand top-of-mind.
Read on to discover different types of push notifications, their benefits, considerations, and how to set up your first mobile push notifications.
Table of contents
- What is a mobile push notification?
- How mobile push notifications work
- 5 Things to know about push notifications
- Ideas and use cases for mobile push notification messages
- How to start sending mobile push notifications
- 5 Mobile push notification best practices
- Strengthen your customer relationships with mobile push notifications
What is a mobile push notification?
A push notification is a brief message that appears on a user's screen, whether on a web browser or a mobile device.
So when we talk about mobile push notifications, we refer specifically to the ones displayed on a user’s device's lock screen or within a mobile app.
Web push notifications, on the other hand, appear on a user’s desktop browser.
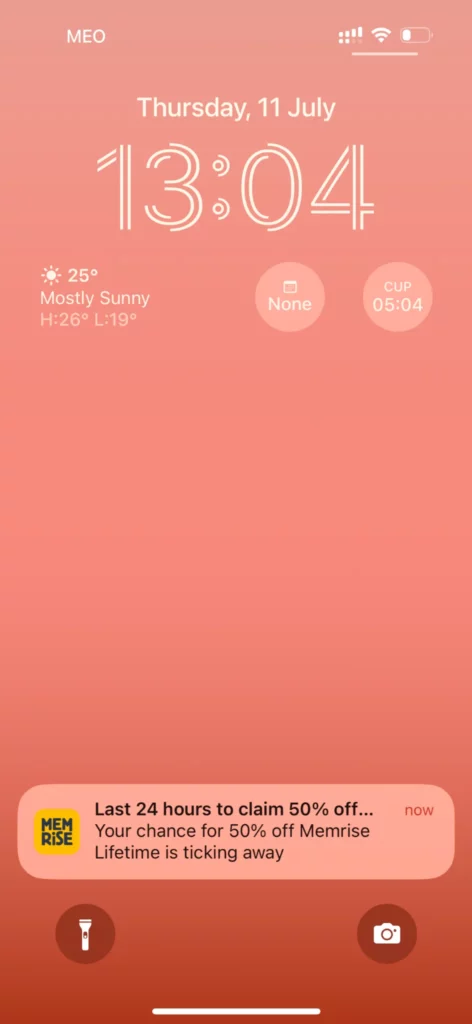
Mobile push notification example
The best thing about push notifications is their near-perfect visibility, even if a user doesn’t click on them.
Unlike emails and ads, which users often ignore, push notifications always win a few moments of mobile users' attention. Whatever your message is, you can rest assured it’s seen.
How mobile push notifications work
Mobile push notifications can be scheduled for a specific time or triggered by a user action, such as abandoning a cart or not logging into the app for a while. Once the condition is met, a message appears on the user’s lock screen or within the app interface.
When a user clicks on the push notification, they’re directed to a dedicated page to complete a desired action, such as logging into the app, redeeming a coupon, or making a purchase.
How long can a push notification stay on the screen?
The duration varies based on several factors, including the operating system and user settings. Most commonly, lock screen notifications stay there until a user interacts with them. If a user unlocks the screen without clicking your notification, it automatically moves to the notification center.
5 Things to know about push notifications
Before you implement mobile push notifications into your strategy, you need to know that:
- You can only send mobile push notifications to users who have downloaded your mobile application or have added your website to their home screen.
- You must obtain explicit permission from users to send push notifications.
- The character limit per notification is around 120 characters depending on the operating system. You need to be creative and concise to convey your message and drive users to action.
- Overloading users with too many notifications can lead to frustration and app uninstalls.
- Furthermore, poorly timed or irrelevant notifications can harm the perception of your brand.
But if you’re willing to stay compliant and respect the privacy of your audience, mobile push notifications will enhance your customer engagement and boost conversion rates.
Related: Discover more about mobile wallet marketing.
Ideas and use cases for mobile push notification messages
Use mobile push messages to promote your marketing campaigns, send alerts, or increase app user engagement. Here are just some examples to inspire your strategy:
Marketing push notifications:
- Announce new product launches or updates.
- Offer time-sensitive discounts or flash sales.
- Provide early access to exclusive content or events.
- Share relevant industry news or pro tips.
Transactional notifications:
- Display order confirmations.
- Send shipment updates.
- Solicit reviews or ratings for recently used services.
Customer experience notifications:
- Remind users about upcoming appointments or bookings.
- Alert customers on updated work hours or scheduled maintenance.
- Inform paying users before the upcoming subscription renewal date.
Customer success & support notifications:
- Encourage inactive users to return to the app.
- Remind new users to complete onboarding.
- Reward loyal customers with personalized offers.
- Notify users about live chat messages or emails (to avoid message overload, you can request explicit user consent for this type of notification).
Tip: Test the effectiveness of push notifications for different types of campaigns gradually. When you get enough data, determine which notifications delivered the best results. Then, focus on them so you don’t overwhelm your audience with too frequent messages.
How to start sending mobile push notifications
Follow this simple process to start sending timely push notifications to your audience’s mobile devices.
1. Sign up for a push notification service
It all starts with selecting the right software. For a seamless CRM experience, we recommend that you choose a tool that integrates well with your relationship marketing suite, such as Brevo.
Brevo provides a comprehensive marketing toolkit, including web and mobile push notification management, available in its Enterprise plan.
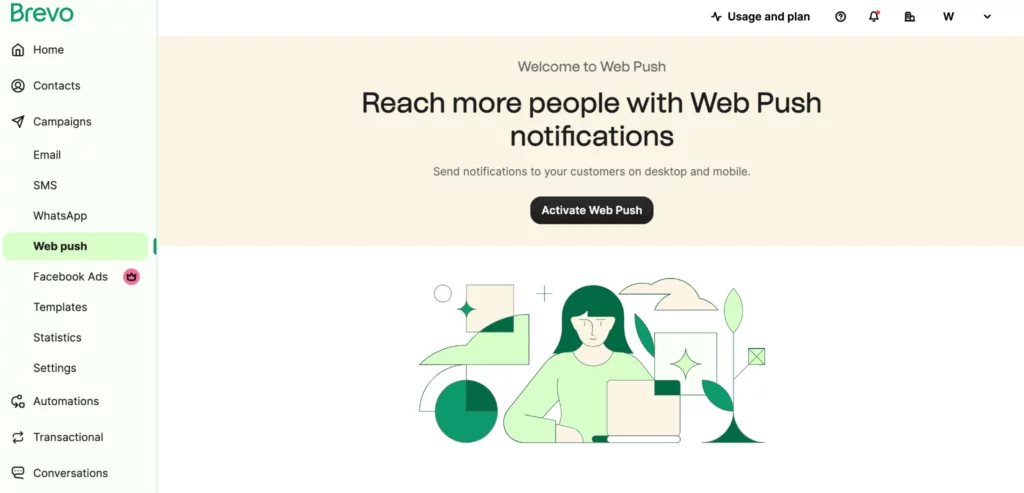
Accessing web and mobile push notification management within Brevo
With it, you can manage your push messages, emails, WhatsApp and SMS marketing campaigns, and much more within a fully integrated software ecosystem.
2. Set up push notifications on Android and iOS devices
Brevo’s push notification functionality is currently powered by WonderPush, a push service acquired by Brevo. You can find installation and authentication guides for both iOS and Android devices in WonderPush’s help center.
To complete the setup, you’ll need basic technical experience or 25 minutes of your developer’s time.
3. Create your first notification
When you’re all set, go to the Notifications tab and choose one of the ready-made templates or click Create notification.
The first thing you should configure here is whether you’re setting up a notification for an Android app, iOS app, web on Android, web on macOS, or web on Windows. Then give your message a title and description and add an image (using an app icon will help you keep your notification on-brand).
If you’re creating a notification for Android, you can opt for a large image — it will be displayed in a large size below the message.
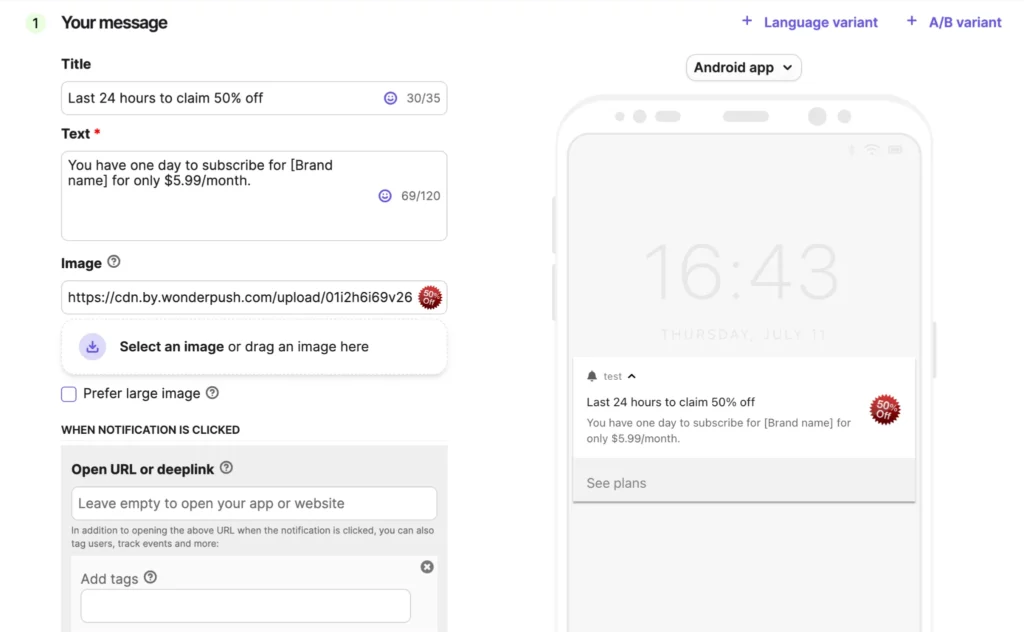
Creating a push message in Brevo
4. Configure your message
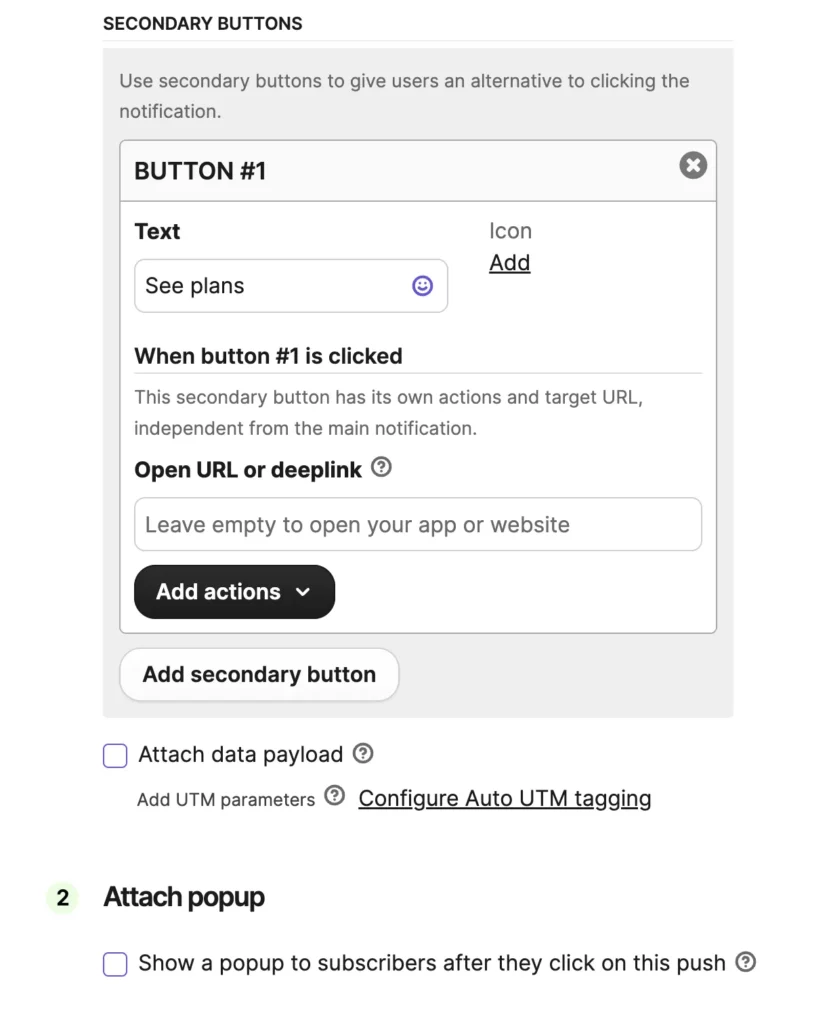
Next, you can define target actions for your message. If you don’t include any target URL or deeplink, users who click the notification will land on your app or website by default. In addition, you can specify actions that will happen in the backend when a user clicks a notification — such as adding a tag, tracking an event, etc.
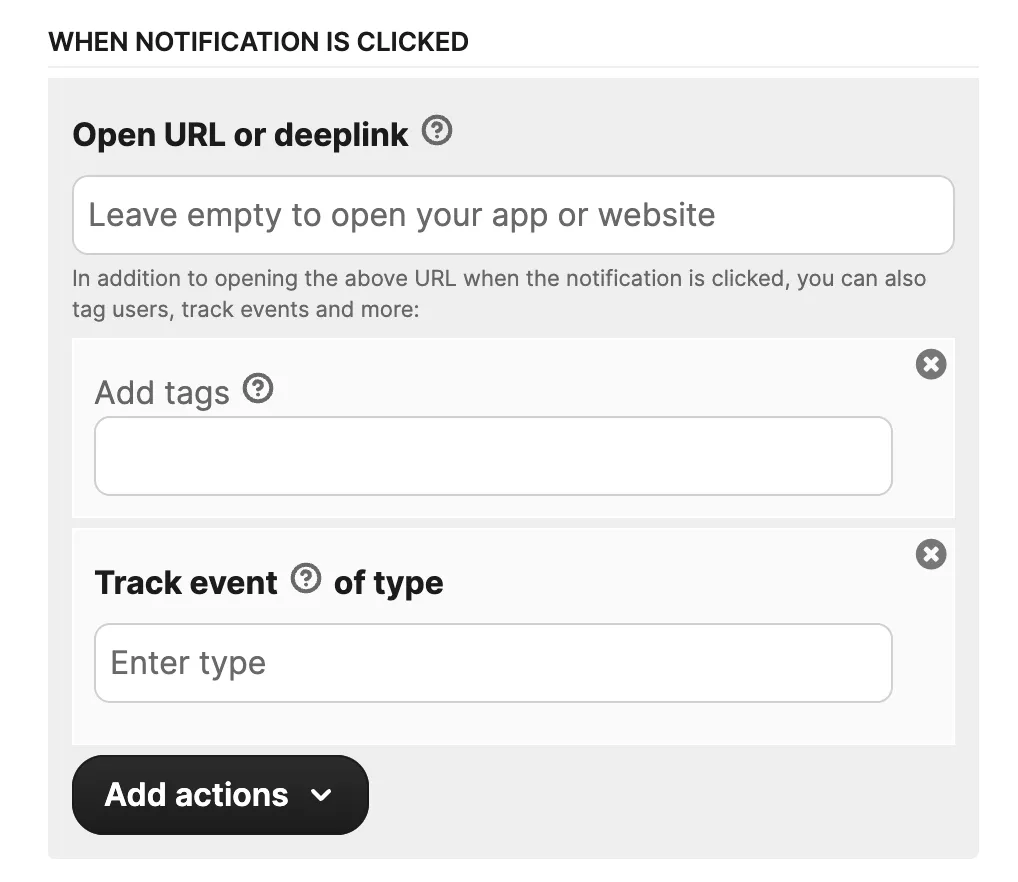
And to include more than one target action, you can attach a secondary button that will drive users to a separate destination. What’s more, you may choose to display a popup once a user clicks your banner.
5. Choose the trigger
Lastly, you can either choose to send the campaign to the specific audience segment or use one of the automation triggers (or both):
- When a subscriber performs an event (a.k.a. event-based automation)
- After a subscriber visits a URL (a.k.a. URL-based automation, only available with web push)
- When a subscriber becomes part of the audience (a.k.a. segment-based automation)
- When a developer makes a call to the Management API
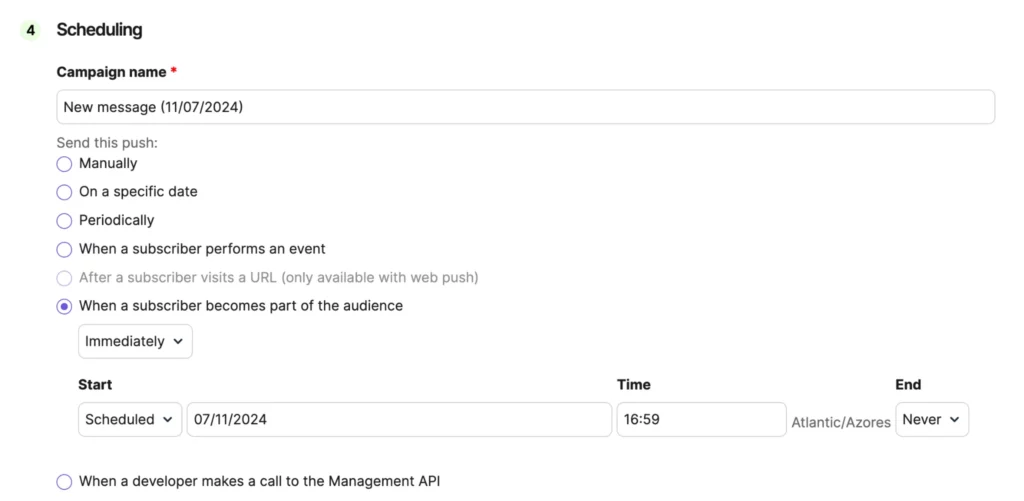
Defining the audience for a notification
Related: Discover the most effective marketing automation examples.
6. A/B test your notifications
If you want to test different versions of your message — and we strongly recommend that you do so — you can add as many variations as you want right in the editor. Brevo will send out your notification variants randomly to even parts of the audience.
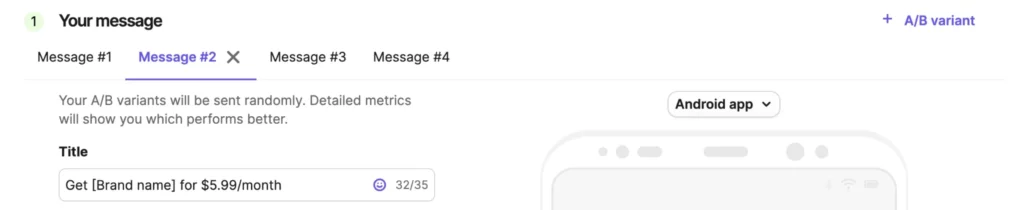
Creating message variants for A/B testing
7. Enable pressure settings
At the bottom of the setup page, you’ll see your pressure settings are on. It means you can choose which category of users will not receive your notification.
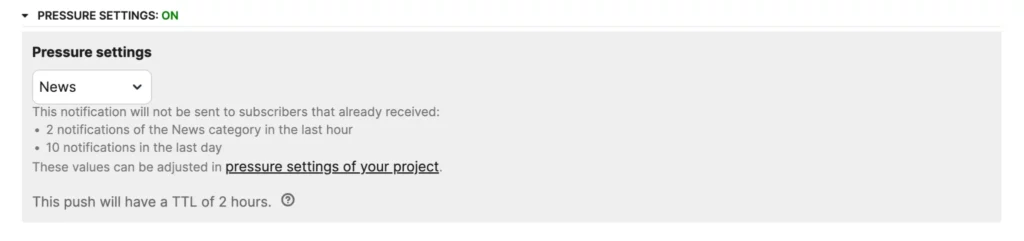
Defining pressure settings in Brevo
You can select one of the existing categories or create custom subscriber protection rules by going to Settings > Pressure. It’s also possible to disable pressure settings by selecting Bypass Subscriber Protection in the dropdown menu, which isn’t recommended.
8. Measure the performance
When you click Save notification and set the toggle to ON, your campaign is active. You can access it in the Notifications tab. Just click its name, and you’ll see the detailed performance breakdown for the entire campaign and for each message in particular.
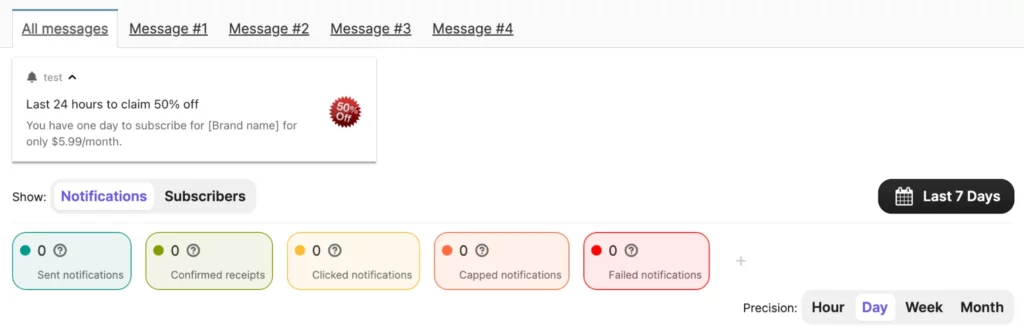
Monitoring the performance of your push notification campaign
You can set up custom metrics to monitor, like users entering a specific segment or taking a secondary action.
Now, wait for the data to aggregate in real time and watch how your users interact with your notifications. Pay close attention to click rates and deactivate or optimize messages that underperform.
5 Mobile push notification best practices
As you’re about to create your first push notification, stick to these tips to provide the best user experience:
Organize your users into segments
Segment your customers into groups based on shared characteristics, and most importantly, keep these segments updated.
There are countless criteria you can use for customer segmentation. Here are some ideas to get you started:
- Users who have visited your pricing page in the last 7 days.
- Users who made purchases on Black Friday last year.
- Users from specific industries (especially for B2B businesses).
- Users experiencing specific pain points.
- Users of certain age or gender demographics.
- Users who abandoned their shopping carts in the last 30 days.
- Users who participated in a recent webinar or online event hosted by your company.
- Users who have rated your app or service with 4 or 5 stars.
For example, an e-commerce brand can segment users based on their purchase history. Buyers who haven't made a purchase in a long time are placed on a separate list from loyal customers. Each group receives tailored messages in push notifications to encourage re-engagement or offer exclusive rewards.
How to keep your segments fresh?
You should be able to set up dynamic segments in your marketing automation software. In Brevo, you can create workflows that will add or exclude contacts from segments based on their interactions with your website or app.
Apply geo-targeting (if relevant)
Geo-targeting allows you to send notifications based on a user’s location. For instance, a retail app might send notifications about in-store sales or events to users who are near a physical store location.
This is a great way to connect your digital efforts with in-store traffic. To implement it, follow these simple steps:
- Prompt users for permission to use their location.
- Enable the collection of location information within your app.
- When setting up your campaign, simply activate the "Target a location" option.
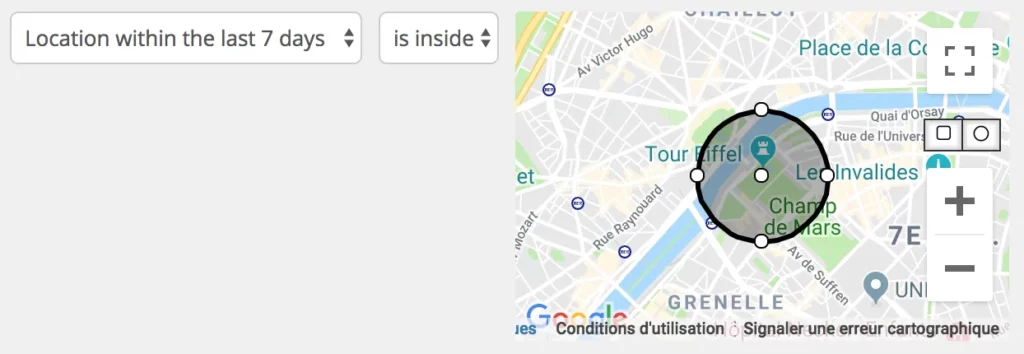
Enabling geo-targeting
Let users choose what notifications they want to receive
First, Google and Apple push notification services require you to request user consent before enabling push notifications for Android and iOS app users, which means you must give them a choice.
But you can go one step further. Instead of only offering the option to enable or disable notifications, allow users to select the types of notifications they want to receive. You’ll not only show respect for their privacy but also increase opt-in rates.
Enable frequency controls
Even when users consent to receive notifications, it doesn’t mean they want to receive your messages every hour.
It’s also in your best interest to avoid overwhelming users. Managing messaging frequency can be challenging with multiple segments and notification workflows.
But if a user belongs to several segments, how do you ensure they only receive one type of notification to avoid overload?
Your push notification platform should allow you to cap the frequency of messages per hour, day, or week. Ideally, it should also let you specify the maximum number of pushes for each category (e.g., marketing, news, transactional).
This way, once a user receives a certain number of messages, they won’t be disturbed by extra notifications, even if they fall under a targeted segment.
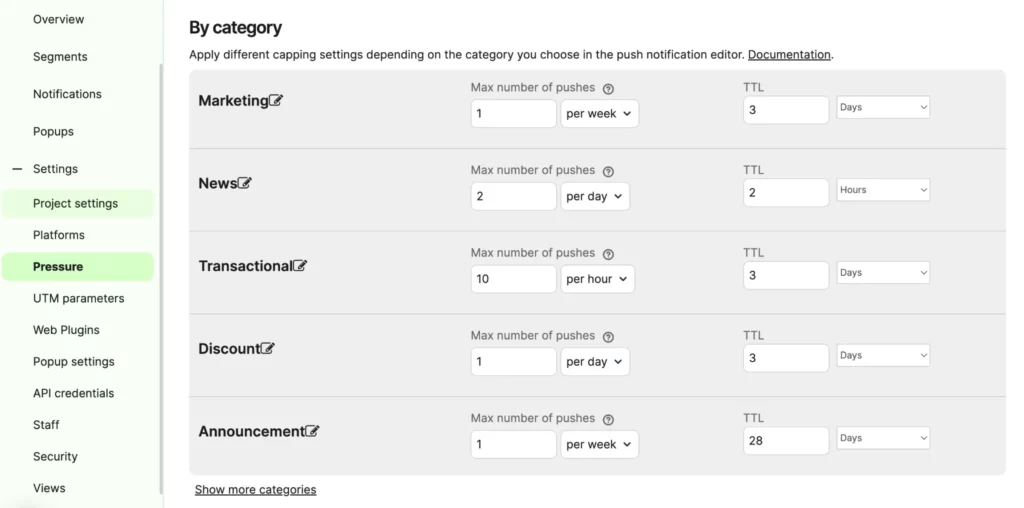
Enabling frequency controls for push notifications
Experiment with messaging and triggers
Push notifications allow you to reach almost 100% visibility for your messages, but you still need to drive users to take the desired action. To maximize the open rates and conversions, you’ll need to experiment with messaging styles and triggers.
Strengthen your customer relationships with mobile push notifications
This is your chance to stay top-of-mind with your customers and boost retention. Set up your first mobile push notifications with Brevo and enjoy the convenience of managing all your customer interactions in one place.
Learn more about Brevo’s omnichannel solutions.