
Supabase magic links let users sign in by clicking a link in their inbox instead of typing a password.
The same method can send a one-time code instead, and Supabase uses the same email system to confirm new signups. Getting the first link to work takes minutes. Keeping it working for every user means deciding which flow to use, how to handle the callback, and how to make sure the email actually arrives.
This guide covers all three auth emails, with code for a Next.js App Router project, ready-to-paste templates, and fixes for the errors people hit most often. Like any transactional email, they only help if they reach the inbox, so the setup starts with delivery.
The information in this article was last updated on October 9, 2026.
Table of Contents
- Magic link, OTP code, or confirmation email: Which one you need
- How to set up Supabase magic links
- How to send an OTP code instead of a link
- Send a magic link and an OTP code in the same email
- How to set up Supabase signup confirmation emails
- Customize your Supabase email templates
- Make sure your magic link emails arrive
- Troubleshooting Supabase magic links
- Choosing the right Supabase auth email setup
Magic link, OTP code, or confirmation email: Which one you need
| What the user does | Best for | Watch out for | |
|---|---|---|---|
| Magic link | Clicks a link to sign in | Fast sign-in on the same device | Link scanners and other browsers can break it |
| OTP code | Types a one-time code in your app | Mobile apps, switching devices | One extra step for the user |
| Signup confirmation | Clicks a link to confirm their address | Email and password signups | Users can't sign in until they confirm |
Magic links and OTP codes use the same method, signInWithOtp. What the user receives depends only on your email template, so you can switch between them, or send both in one email, without changing your sign-in code.
How to set up Supabase magic links
Step 1: Set up custom SMTP
Start here, because two things depend on it. Supabase's built-in email service sends at most 2 emails per hour, and only to members of your Supabase organization. And until you connect a custom SMTP provider, Supabase won't let you edit the email templates you'll need in step 5.
In the Supabase dashboard, go to Authentication > Emails > SMTP Settings, turn on Enable custom SMTP, and fill in the form. With Brevo's SMTP relay, use:
- Host: smtp-relay.brevo.com
- Port: 587
- Username: your SMTP login, shown in Brevo under Settings > SMTP & API, in the SMTP tab
- Password: an SMTP key generated on the same page (not your API key)
- Sender email and name: an address verified in Brevo, and your app's name
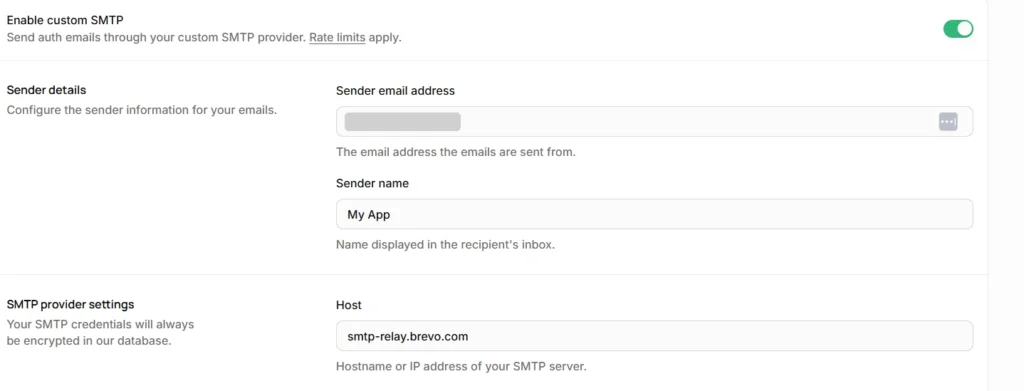
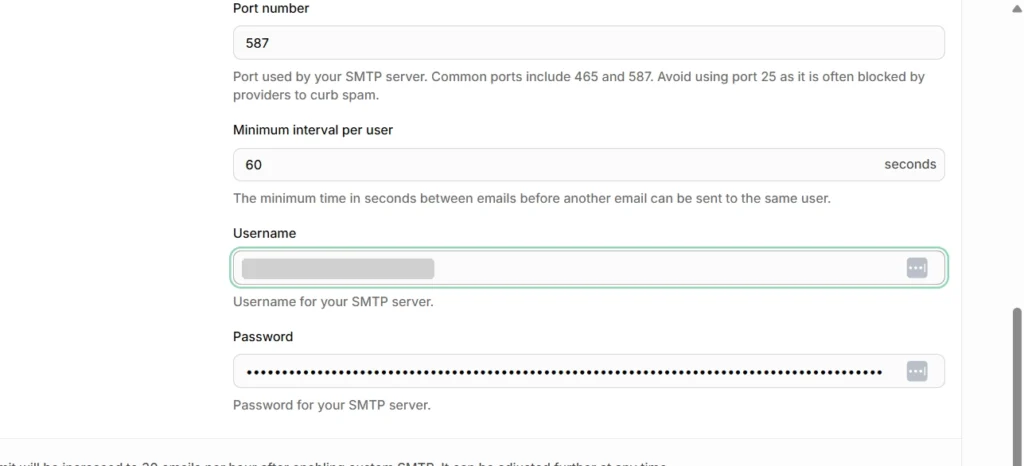
Enabling custom SMTP raises Supabase's limit from 2 to 30 emails per hour. The last section of this guide covers the other settings that keep auth emails out of spam.
Step 2: Configure your URLs
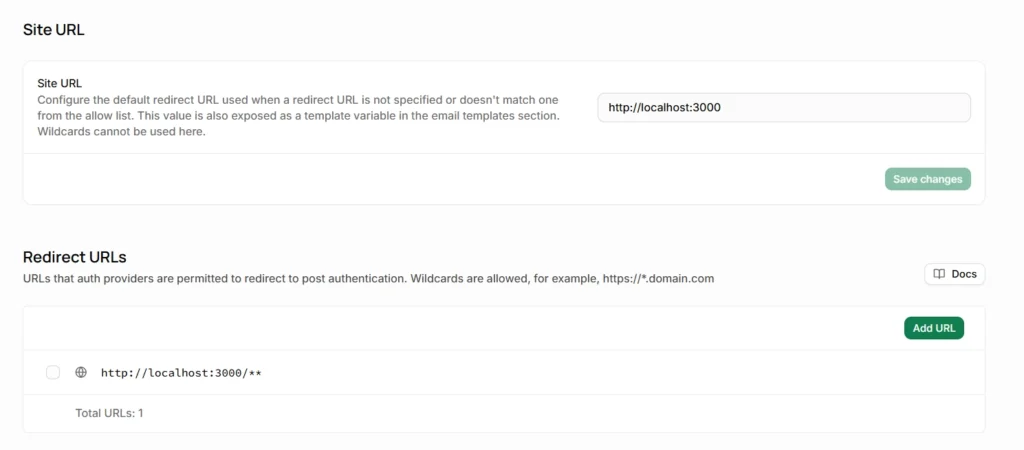
In the Supabase dashboard, go to Authentication > URL Configuration:
- Site URL: your app's main URL. Supabase uses it when no redirect URL is passed.
- Redirect URLs: every URL a magic link may send users to. Add each origin your app runs on (for example http://localhost:3000 and your production domain), plus wildcards such as http://localhost:3000/** or https://*-your-team.vercel.app/** for preview deployments.
The redirect URL your app passes must match an entry in this list.
Step 3: Create the Supabase clients
With the @supabase/ssr package, create a server client that reads and writes auth cookies (lib/supabase/server.ts):
import { createServerClient } from "@supabase/ssr";
import { cookies } from "next/headers";
export async function createClient() {
const cookieStore = await cookies();
return createServerClient(
process.env.NEXT_PUBLIC_SUPABASE_URL!,
process.env.NEXT_PUBLIC_SUPABASE_PUBLISHABLE_KEY!,
{
cookies: {
getAll() {
return cookieStore.getAll();
},
setAll(cookiesToSet) {
try {
cookiesToSet.forEach(({ name, value, options }) =>
cookieStore.set(name, value, options),
);
} catch {
// Called from a Server Component: safe to ignore
// if your proxy/middleware refreshes sessions.
}
},
},
},
);
}
And a browser client for client components (lib/supabase/client.ts):
import { createBrowserClient } from "@supabase/ssr";
export function createClient() {
return createBrowserClient(
process.env.NEXT_PUBLIC_SUPABASE_URL!,
process.env.NEXT_PUBLIC_SUPABASE_PUBLISHABLE_KEY!,
);
}
Both read NEXT_PUBLIC_SUPABASE_URL and NEXT_PUBLIC_SUPABASE_PUBLISHABLE_KEY from your environment. You also need the session-refresh proxy (middleware.ts before Next.js 16) from Supabase's Next.js guide, so users stay signed in.
Step 4: Send the magic link
const { error } = await supabase.auth.signInWithOtp({
email,
options: {
shouldCreateUser: false, // only existing users can sign in
emailRedirectTo: window.location.origin, // used as {{ .RedirectTo }} in the template
},
});
By default, signInWithOtp creates an account if the email isn't registered yet. Set shouldCreateUser: false if only existing users should sign in this way. Passing your app's origin as emailRedirectTo lets the email template send users back to the right environment, whether that is localhost, a preview deployment, or production.
Step 5: Add the callback route
The link in the email needs somewhere to land. The most reliable option is a route that receives a token_hash and exchanges it for a session with verifyOtp (app/auth/confirm/route.ts):
import { type EmailOtpType } from "@supabase/supabase-js";
import { redirect } from "next/navigation";
import { type NextRequest } from "next/server";
import { createClient } from "@/lib/supabase/server";
export async function GET(request: NextRequest) {
const { searchParams } = new URL(request.url);
const token_hash = searchParams.get("token_hash");
const type = searchParams.get("type") as EmailOtpType | null;
// Only allow relative paths, to avoid open redirects
const nextParam = searchParams.get("next") ?? "/";
const next =
nextParam.startsWith("/") && !nextParam.startsWith("//") ? nextParam : "/";
if (token_hash && type) {
const supabase = await createClient();
const { error } = await supabase.auth.verifyOtp({ type, token_hash });
if (!error) {
redirect(next);
}
}
redirect("/auth/auth-code-error");
}
The route only accepts relative next paths, so nobody can turn your sign-in link into a redirect to another site. Create an /auth/auth-code-error page too, so users who follow an expired link see a clear message and a way to request a new one.
Then point the Magic link or OTP template at this route. In Authentication > Emails > Templates, open it and use:
<h2>Sign in to your account</h2>
<p><a href="{{ .RedirectTo }}/auth/confirm?token_hash={{ .TokenHash }}&type=email&next=/dashboard">Sign in</a></p>
{{ .RedirectTo }} is the emailRedirectTo value from your code, so pass only your app's origin there, as in step 4. A value like https://example.com/dashboard would produce a link to /dashboard/auth/confirm, which doesn't exist. If your app doesn't pass a redirect, use {{ .SiteURL }} instead.
Why not keep the default {{ .ConfirmationURL }} link? With @supabase/ssr, Supabase uses the PKCE flow, which stores a code verifier in the browser that started the sign-in. If the user opens the email on their phone after requesting the link on their laptop, the exchange fails. The token_hash link needs no stored verifier, so it works in any browser.
Some email security scanners also open links before the user does. Because this route verifies the token as soon as the link is opened, a scanner can use it up. Supabase suggests two fixes: send an OTP code instead of a link, or link to a page with a button, so the token is only verified when a person clicks. Both are covered below.
How to send an OTP code instead of a link
To send a code, replace the link in the Magic link or OTP template with the {{ .Token }} variable:
<h2>Your sign-in code</h2>
<p>Enter this code to sign in: <strong>{{ .Token }}</strong></p>
Your app then asks for the code and verifies it:
const { error } = await supabase.auth.verifyOtp({
email,
token: code,
type: "email",
});
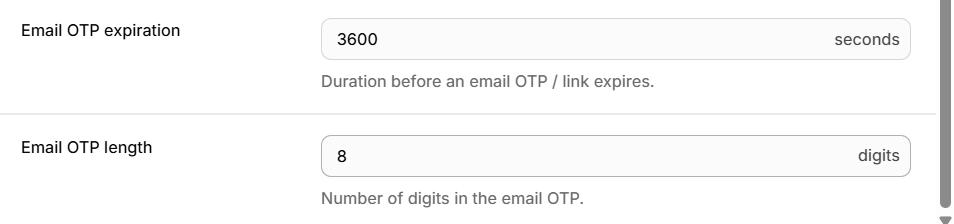
Check how long your codes are before you build the input field. Supabase describes a six-digit code, but recent projects default to 8 digits. You can set the length between 6 and 10 digits, and change the code's lifetime, in the Email provider settings (Authentication > Sign In / Providers > Email).
Send a magic link and an OTP code in the same email
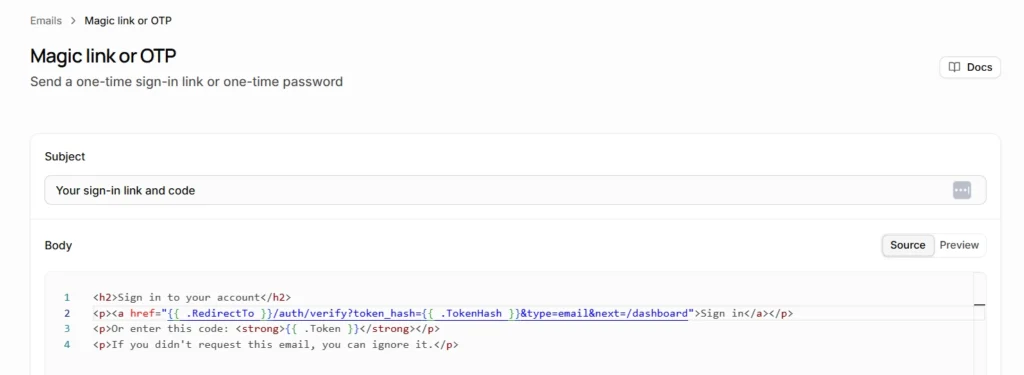
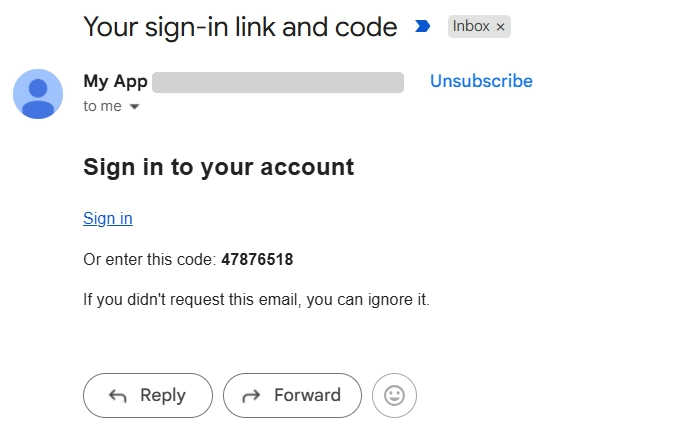
You don't have to choose. A template can contain both, so users click the link on the device where they requested it, or type the code anywhere else:
<h2>Sign in to your account</h2>
<p><a href="{{ .RedirectTo }}/auth/verify?token_hash={{ .TokenHash }}&type=email&next=/dashboard">Sign in</a></p>
<p>Or enter this code: <strong>{{ .Token }}</strong></p>
<p>If you didn't request this email, you can ignore it.</p>
Here is a complete login page that handles both paths (app/login/page.tsx):
"use client";
import { useState } from "react";
import { createClient } from "@/lib/supabase/client";
export default function LoginPage() {
const supabase = createClient();
const [email, setEmail] = useState("");
const [code, setCode] = useState("");
const [step, setStep] = useState<"email" | "code">("email");
const [message, setMessage] = useState("");
async function sendEmail() {
const { error } = await supabase.auth.signInWithOtp({
email,
options: { emailRedirectTo: window.location.origin },
});
if (error) return setMessage(error.message);
setStep("code");
setMessage("Check your inbox for a sign-in link or code.");
}
async function verifyCode() {
const { error } = await supabase.auth.verifyOtp({
email,
token: code,
type: "email",
});
if (error) return setMessage(error.message);
window.location.href = "/";
}
return (
<main>
{step === "email" ? (
<>
<input value={email} onChange={(e) => setEmail(e.target.value)} placeholder="[email protected]" />
<button onClick={sendEmail}>Email me a sign-in link</button>
</>
) : (
<>
<input value={code} onChange={(e) => setCode(e.target.value)} placeholder="Code from your email" />
<button onClick={verifyCode}>Verify code</button>
</>
)}
<p>{message}</p>
</main>
);
}
The link and the code share the same one-time token ({{ .TokenHash }} is a hash of {{ .Token }}). If an email security scanner opened a link that pointed straight at /auth/confirm, it would use up the token, and the code would stop working too. That's why this template links to /auth/verify instead. This page only shows a Sign in button, so the token is verified when a person clicks, not when a scanner fetches the page. Create it in app/auth/verify/page.tsx:
export default async function VerifyPage({
searchParams,
}: {
searchParams: Promise<{ token_hash?: string; type?: string; next?: string }>;
}) {
const { token_hash, type, next } = await searchParams;
return (
<form action="/auth/confirm" method="get">
<input type="hidden" name="token_hash" value={token_hash ?? ""} />
<input type="hidden" name="type" value={type ?? "email"} />
<input type="hidden" name="next" value={next ?? "/"} />
<button type="submit">Sign in</button>
</form>
);
}
The button sends the same parameters to the /auth/confirm route from step 5, so that route doesn't change. Scanners fetch the page but don't submit the form, and the token stays valid until the user clicks.
One more detail for the login page: don't limit the code field to 6 characters. The length can be anywhere from 6 to 10 digits, and recent projects default to 8.
How to set up Supabase signup confirmation emails
If "Confirm email" is enabled in your Email provider settings, users who sign up with a password must confirm their address before their first sign-in. It works like a double opt-in for newsletters. Pass the redirect when they sign up:
const { error } = await supabase.auth.signUp({
email,
password,
options: { emailRedirectTo: window.location.origin },
});
Then use the same callback route in the Confirm sign up template:
<h2>Confirm your email address</h2>
<p><a href="{{ .RedirectTo }}/auth/confirm?token_hash={{ .TokenHash }}&type=email&next=/welcome">Confirm your email</a></p>
If the email never arrived or the link expired, let users request a new one:
await supabase.auth.resend({
type: "signup",
email,
options: { emailRedirectTo: window.location.origin },
});
The same pattern covers password resets: in the Reset password template, use type=recovery and set next to the page where users choose their new password.
Customize your Supabase email templates
Supabase templates accept several variables. These are the ones you'll use most:
| Variable | Contains |
|---|---|
| {{ .ConfirmationURL }} | The default confirmation link |
| {{ .Token }} | The one-time code (6 to 10 digits, set per project) |
| {{ .TokenHash }} | A hashed version of the token, for your own callback links |
| {{ .SiteURL }} | Your Site URL |
| {{ .RedirectTo }} | The redirect URL passed by your app |
| {{ .Data }} | The user's metadata (auth.users.user_metadata) |
| {{ .Email }} | The user's email address |
Keep auth emails short and plain, with one clear action, your brand name in the subject line, and a line telling users what to do if they didn't request the email. Our transactional email design examples show how to keep this kind of email clean and recognizable. If you want to design auth emails in a visual editor rather than in HTML, you can send them through Brevo templates with Supabase's Send Email Hook.
Make sure your magic link emails arrive
A perfect flow is useless if the email lands in spam. Once custom SMTP is set up (step 1), these email deliverability best practices matter most for auth emails:
- Authenticate your domain with SPF, DKIM, and DMARC, so inbox providers trust your auth emails. Our guide to SPF, DKIM, and DMARC walks through it.
- Don't let link tracking rewrite auth links. Supabase warns that click tracking rewrites the links in auth emails, and they stop working as expected. Turn tracking off for these emails.
- Check the Supabase rate limit. Custom SMTP starts you at 30 emails per hour. You can raise it in Authentication > Rate Limits.
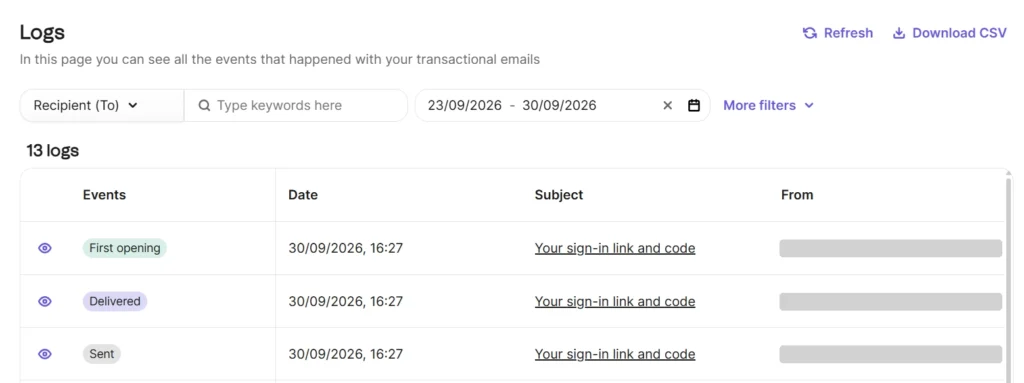
Brevo's free plan includes 300 emails per day with SMTP access, which covers auth emails for most early-stage apps. See how Brevo handles transactional email.
Troubleshooting Supabase magic links
| Problem | Likely cause | Fix |
|---|---|---|
| "Email link is invalid or has expired" (otp_expired) | The link was used already, expired, or was opened by a link scanner | Link to a page with a button so the token is only verified on click, offer the OTP code as an alternative, and let users request a new link |
| The link works on desktop but not on the phone | PKCE code verifier is stored in the first browser | Switch the template to the token_hash callback route |
| Users land on the Site URL instead of your page | Redirect URL isn't on the allow list, or the template uses {{ .SiteURL }} | Add the URL (or a wildcard) in URL Configuration and use {{ .RedirectTo }} in the template |
| over_email_send_rate_limit | Too many emails from the project, or a repeat request within 60 seconds | Set up custom SMTP, raise the limit, and show a countdown before "Resend" |
| email_address_not_authorized | Built-in email only sends to your organization's members | Set up custom SMTP |
| The email never arrives | Spam filtering or an unauthenticated domain (see how spam filters work) | Check your provider's logs and authenticate your domain |
Before launch, run each flow end to end with a test inbox. Our guide on how to test transactional emails in staging covers practical ways to do that.
Choosing the right Supabase auth email setup
For most apps, the most reliable setup combines custom SMTP with an authenticated domain, a token_hash callback route, and a template that links to a page with a Sign in button, with the OTP code in the same email. The button keeps link scanners from using up the token, the code helps users who open the email on another device, and custom SMTP gets you past the built-in email limits.
Brevo can send those auth emails alongside the rest of your app's email, from receipts to onboarding campaigns, with 300 free emails per day and no credit card needed. Get started with Brevo's email API today.