The email signup form — no email marketing strategy is complete without it. If you want to grow your email list, you’ll need a compelling form in all the right places. Want to learn how to make the most of this simple yet powerful tool? Read on!
First things first: it helps to understand why signup forms are so important. You’re just asking for an email address, so what’s the big deal?
Well, what if we told you there’s something special about users who sign up using your form?
These are the people who have engaged with your content, liked what they saw, and want more. Engaged and interested, these are exactly the kind of contacts you want! (And most likely to lead to conversions later down the line.)
What makes a good signup form?
There are a few things an email signup form can and should do:
- Make the subscription process as simple as possible. Users should be able to subscribe to your newsletter in a matter of seconds.
- Create a positive first impression of your brand. A lackluster, buggy or over-complicated form will make users think twice about the signup.
- Provide you with audience insights. The signup form can be a good opportunity to learn about your subscribers and their interests, but don’t overdo it. Remember, simplicity rules.
4 crucial elements of a successful email signup form
Building your email signup form is only one part of the process. For optimal results, we strongly recommend following these four pieces of advice:
- Build the form using a form builder tool. This feature should come with your email marketing platform. If you’re using Brevo, stick around because we’ll be detailing this process further down.
- Implement a double opt-in email. This is an automatic email sent out to new subscribers with a link to confirm their email address. This is a great way to prove subscriber consent (super important for GDPR) and to ensure that email addresses are entered correctly.
- Place the signup form in strategic locations. Add the form to your website and social media profiles, link it in your emails, or add it as a widget to your CMS using a plugin (like the free Brevo WordPress newsletter integration).
- Set up a welcome email. Greeting new subscribers and getting the relationship off to a good start is key to positive customer journeys. Best of all, automation features mean you don’t have to do anything but create the email itself.
So you know you need a form, and you know it needs to make an impact. Ready to make it happen? Let’s go step by step through how to create a newsletter signup form with Brevo.
Don’t have a Brevo account? Sign-up in just a few minutes and follow along to make the most of this tutorial!
Create my free Brevo account today
Step 1: Create an email signup form with Brevo
Start by clicking on “Contacts” in the sidebar. Then go to “Forms” on the left-hand side menu.
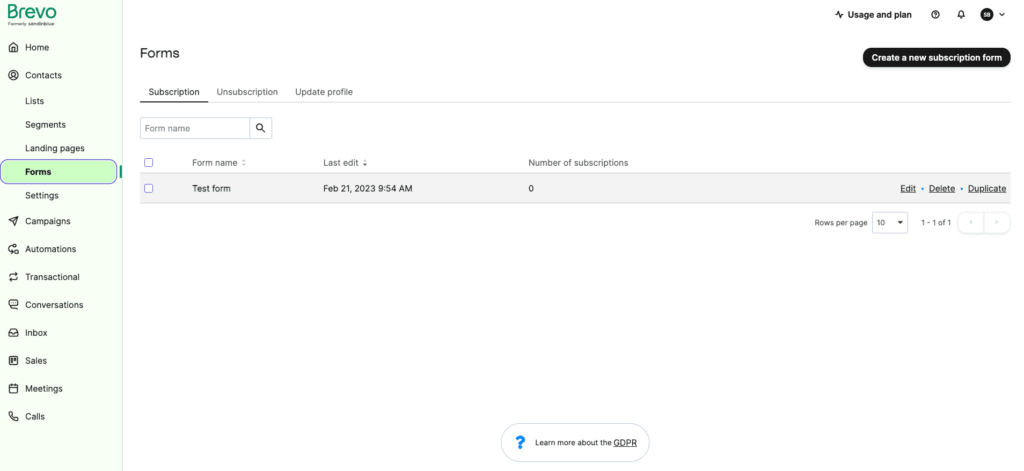
Now click on the “Create a subscription form” button.
Then give your form a name so that you’ll be able to find it within your account. (The name you choose here will be used only internally).
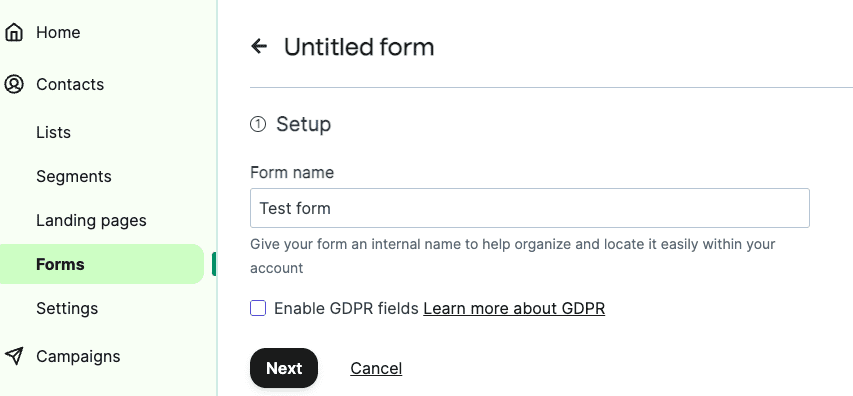
As well, you’ll need to decide whether you want to include GDPR fields on your subscription form. If you’re unsure, it’s never a bad idea to be GDPR compliant. It’s seen as the gold-standard for all things data protection and is easy to do with services like Brevo.
Take a look at our guide to GDPR and email marketing for more information.
Step 2: Design the form
When you get to step 2, it’s time to think about form design! Brevo’s subscription form builder comes preloaded with a basic template to get you started:
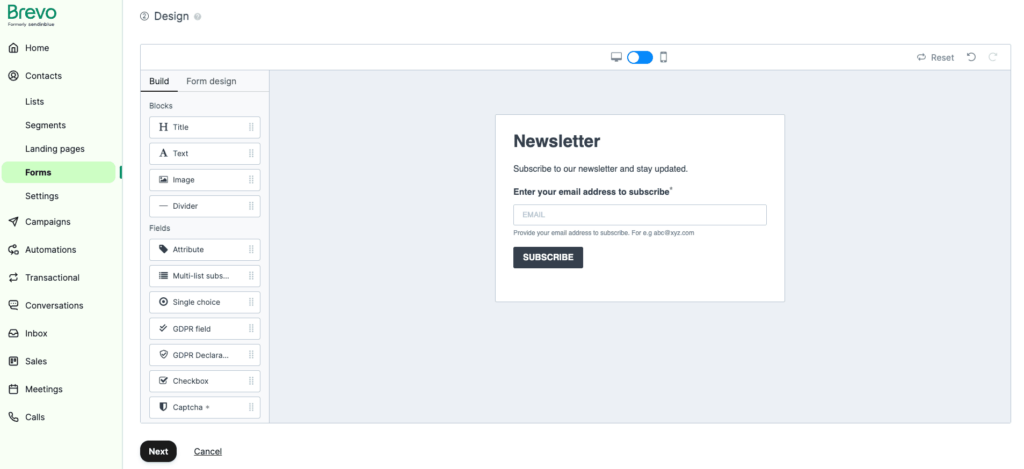
From here, the drag and drop editor makes designing your sign-up form easy. Choose your text font, color, and size. Add images or graphics as you like. And most importantly, customize the form fields to get whatever information you need from new subscribers.
Those using the Brevo email editor will already be familiar with the drag and drop process. If it’s your first time, don't worry. It’s super easy. Check out this post on how to create a newsletter for more details.
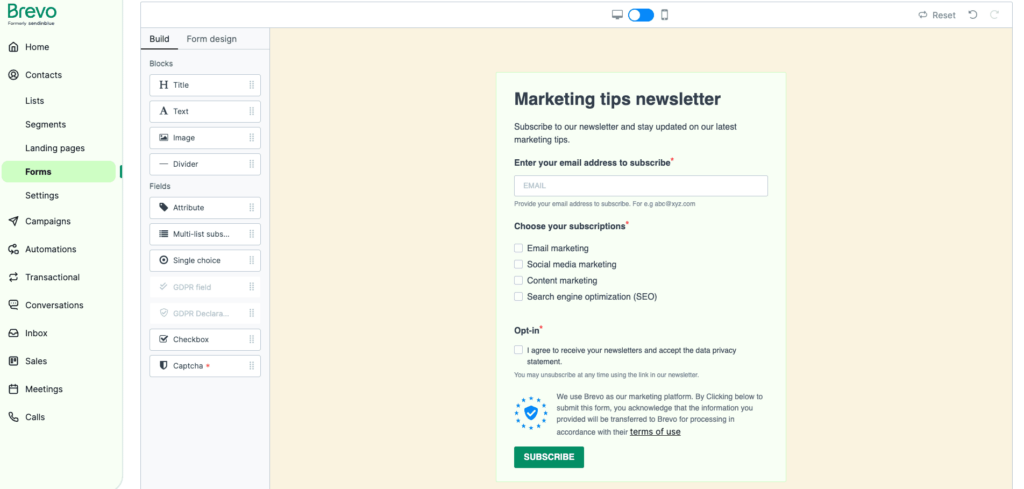
This example only took a few minutes to create. And using your business’s brand kit can speed up the process even more!
Design tip: When it comes to subscription form design, think clean and minimal. Stick to one single column, and obey your brand kit.
Insert the content & call to action
Your signup form is part of your brand, so wording and tone are crucial. If your website is formal and businesslike, the signup form should be too. If your overall branding is more lighthearted, your form can be a little more tongue-in-cheek.
In general, though, your subscription form language should be clear, direct, and on-brand. Anything else may complicate the signup process and deter potential subscribers.
Another important element of your signup form is the CTA. The CTA button in Brevo’s subscriptions form editor comes auto-filled saying “Subscribe.” But don’t settle for generic!
Tell the user what they stand to gain by subscribing to your newsletter. For example: “Yes, I want all the latest updates” or “Grab my 10% discount”. Much more convincing, right?
It’s also important to consider the order in which your fields appear. The email address field is undoubtedly the most important, so make sure this and your CTA both stand out.
Choose your form fields
Next, think about the fields you want to include. The email address field is a must, but you may also wish to gather a bit more information about your new subscribers by adding contact attribute fields. Things like name, date of birth and location can be extremely useful when it comes to personalizing your emails and segmenting your audience.
In addition, take a look at the example above. It asks about what marketing topics new subscribers are interested in. Adding form fields like this is a great way to get a head start on categorizing your new subscribers and building targeted email lists.
Even better, when a new subscriber selects a topic, they’re automatically added to the corresponding email list in your Brevo account.
To learn more about this feature, check out our help centre page on multi-list subscription fields.
But remember, user experience should take priority here. If they have to manually enter too many details, they may give up altogether. Checkboxes are always easier than extended responses. And just to make things clear, you should never be asking for credit card information in a subscription form.
If you do decide to add more fields, pick just a few and make them optional. This way, the user can skip them if they want to, and you still get that all-important email address. You can always build up user profiles later: the number one priority at this stage is to get them on your email list.
Step 3: Choose a contact list
Next, you’ll need to choose one or more lists to add new subscribers to. You also have the option to create a new list at this stage.

If you’ve created a multi-list subscription form (like the example above), then selecting additional lists is optional at this stage.
Step 4: Set Up a Confirmation Email
Step 4 lets you manage how new subscribers will confirm their signup. You can use an on-page confirmation and/or send a customized confirmation email.
For GDPR compliance and to make sure you’ve got the right email address, we recommend the second option, also known as a double opt-in confirmation email.
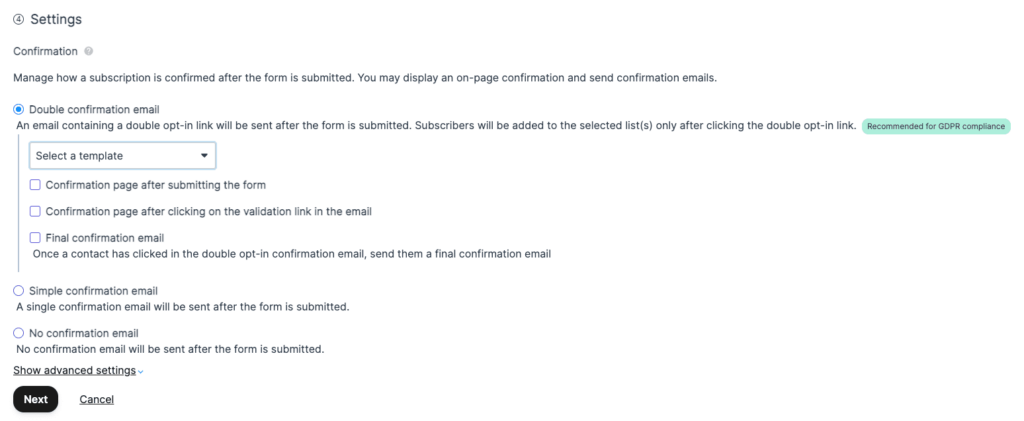
Within the double opt-in email selection, you have the option to send the default confirmation template or use one you created. (You can create double opt-in forms in the “Templates” section of the “Campaign” tab in your Brevo account.)
Step 5: Confirmation Messages
Once your new subscribers have submitted the signup form, they’ll receive a confirmation message. (And hopefully not an error message!) You have the option to customize these messages to match your brand’s voice.
Brevo provides you with the following pre-written messages, but feel free to change things up and make them your own!

Step 6: Add the Signup Form to Your Website and Other Places
Location is everything. Of course, you want your form to be visible. But at the same time, it’s important not to disrupt user experience. To help you strike the right balance, here are some key signup form hotspots:
Homepage
It sounds obvious, but this prime location is often overlooked. There is every chance that a user will bounce from your website without even exploring beyond the homepage. This doesn’t mean they’re not interested, but they may have already found the information they were looking for.
Make sure you give users the opportunity to subscribe to your newsletter before they go. Place the signup form somewhere visible, for example in the sidebar, header or even footer. Pop-up forms can work too, but make sure you give users some time to explore your homepage beforehand.
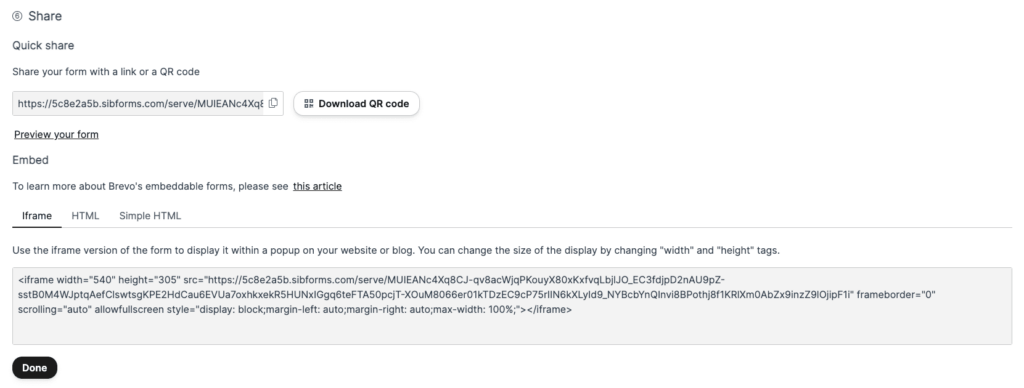
Adding subscription forms to your website is easy. Once you’ve saved the form on Brevo, the next step is “Share” where you’ll find the code to embed on your site. Simply paste into your website and the form will appear.
Blog
If someone is reading your blog, they’re likely a fan of your content – and therefore an ideal candidate for your mailing list! This is the perfect time to ask if they want similar content delivered straight to their inbox. Place your signup form at the end of each individual post, or in the sidebar.
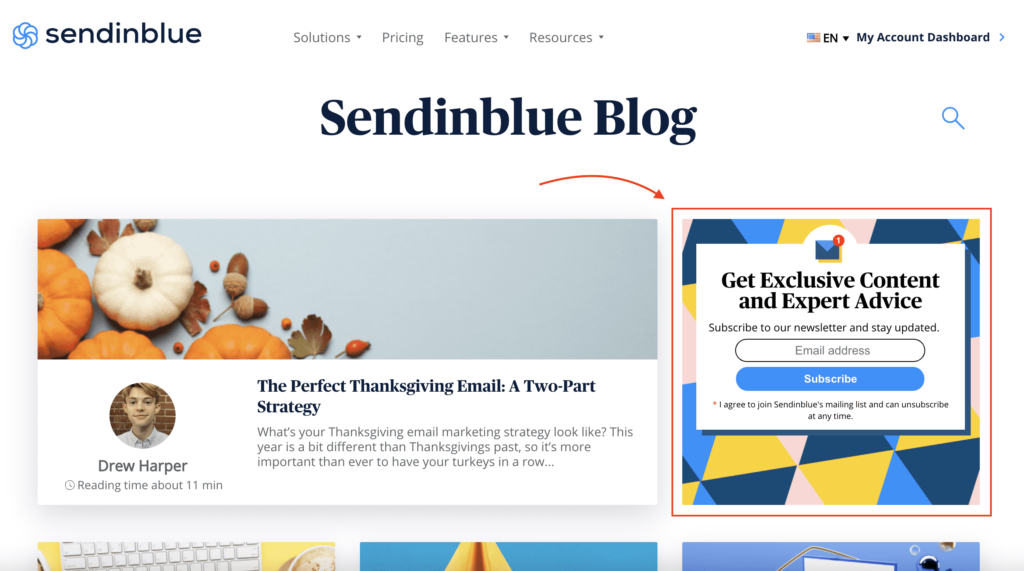
Here’s a look at the form we use for Brevo’s Marketing Newsletter. It’s featured on our blog homepage to capture as many new subscribers as possible.
Contact page
If a user lands on your contact page, they probably want to get in touch. This shows clear interest in your products or services, so why not float your newsletter as another way to stay in touch?
If they’re taking the time to fill out a contact form, they can probably be convinced to sign up for your newsletter at the same time.
Social media
Maybe more than anyone else, your followers on Facebook, Twitter, Instagram and LinkedIn are ideal for your mailing list. You’ve already got their attention and convinced them you’re worth a follow, so use their favorite platforms to get them on your email list too.
Include a link to your signup form in your bio or share it as part of an exclusive content offering. (You can find this link in the “Share” stage of the signup form builder).
At checkout
If the user is completing a transaction, you can include your email subscribe form as part of the process. Want to sweeten the deal? Offer an exclusive 10% off their first purchase.
Gated content
Nothing generates email addresses like gated content. Create an exclusive whitepaper, report or infographic and let the user download it for free in exchange for their email address. Ebooks, webinars, quiz results, and reports also work well as gated content.
Bonus: Automated welcome emails
Finally, you’re going to want to set up an automated welcome email to make a great first impression of your brand for new subscribers. It’s the perfect opportunity to get things started on the right foot along the customer journey.
Consider showing your new subscribers an overview of your products/services. Or give them a general introduction to your business and the people behind it.
You could try embedding a short questionnaire or feedback form to collect some additional contact details, but make sure it’s nothing too lengthy. Your new subscribers may not be in the mood to do anything overly involved at this point.
To clarify, the automated welcome email should be a separate email from the double opt-in confirmation. They’re both important, but serve different purposes.
The double opt-in confirmation is the best way to confirm a subscriber’s consent. It also ensures their address is correct and in use. Once they click the “confirm” button, they’re added to your email list.
At this point, your official new subscriber should get a welcome email. To learn more, take a look at our post on writing effective welcome emails that lead to conversions.
Wrap up: How to create an email signup form
So now that you know what’s involved in setting up a successful newsletter subscription form, it’s time to create your own!
Also, it’s worth noting that while these forms are most often used for email newsletter signups, you could easily adapt them to work as event registration forms, signups for fundraising campaigns, or giveaway programs.
If you’re looking for further help with your email signups, head over to the Brevo Help Centre’s page on how to create a subscription form.
And without further ado, now it’s your turn to fill out a sign up form!


