For anyone running a WooCommerce store, email marketing is an essential promotion channel. Learn how to set up your WooCommerce newsletter and what it can do for ecommerce conversions.
What is a WooCommerce newsletter?
WooCommerce newsletters are a form of email marketing used to promote products, services, and content as well as maintain regular touch points with email list subscribers. They’re just like other newsletters, but sent to contacts from WooCommerce (WordPress’s ecommerce platform). Businesses across industries use newsletters as a key element of their overall email marketing strategy.
WooCommerce newsletters often feature content like blog articles, brand updates, and new releases. Newsletters can also promote sales or giveaways. The main purpose of a WooCommerce newsletter, however, is to keep email subscribers engaged.
Why every woocommerce store needs email marketing
Ecommerce retailers in particular rely on newsletters to cultivate a sense of community around their brand.
If you run an ecommerce website, newsletters are essential for:
- Building relationships and trust with potential buyers
- Maintaining regular contact with your previous buyers
- Showcase your products and promotions
- Communicate news and important information
Think about it — WooCommerce checkout is the perfect opportunity to ask customers if they want to stay in touch via your email list. From there, you can keep them up to date on your brand and nurture them into returning customers!
How to send a WooCommerce newsletter
In order to send a WooCommerce newsletter, you’ll need a WooCommerce newsletter plugin. There are many newsletter plugins on the market. If your email marketing solution supports WooCommerce integration, it’s probably easiest to use that plugin.
Email marketing tools
If you don't have an email marketing solution, here are a few options that offer WooCommerce plugins.
Brevo
The Brevo WooCommerce plugin offers all the functionality you’ll need to send engaging newsletters to customers. Grow your email list with customizable signup forms.
In addition to newsletters, the Brevo WooCommerce plugin allows you to:
- Send confirmation emails
- Use WooCommerce order variables directly within email templates
- Monitor email metrics like delivery, open rate and click-through rate
- Manage subscriptions (opt-out, opt-in or double opt-in) on the checkout page
- Track orders via transactional logs (order ID, price, etc.)
- Create and send confirmation SMS after ordering or shipment
- Send SMS campaigns to all customers or subscribers
What’s great about this WooCommerce newsletter plugin is that it’s free and can even be used with the free Brevo plan. Send 300 newsletters and transactional emails per day! (Or 9,000 per month.)
Mailchimp
Mailchimp is one of the most popular email marketing services. It’s great for beginners and allows you to send up to 1,000 emails per month. If all you need is to add a newsletter subscription form to your WooCommerce store, Mailchimp is a solid option.
If you’re looking for more advanced capabilities, though, you’ll have to upgrade to a paid plan. For instance, with the free Mailchimp plan, you’re only able to create one signup form and store 500 contacts.
And for transactional emails (order confirmations, shipping notifications, password resets), you’ll need to buy a separate add-on plan.
Mailpoet
Mailpoet is another favorite WooCommerce newsletter plugin. It’s known for being very user-friendly. On the free plan, you can store up to 1,000 contacts and send up to 5,000 newsletters and transactional emails per month.
While MailPoet is great for beginners, it has some limitations. Beyond email marketing, the platform is pretty limited in terms of capabilities. In addition, MailPoet is an email service primarily for WordPress, meaning that if you switch to Shopify or another ecommerce platform, you’ll need to change your entire email marketing operation too.
Sending a WooCommerce Newsletter with Brevo
Next, we’ll walk you through how to send a WooCommerce newsletter with Brevo, including connecting the two platforms, syncing your contacts, and setting up your signup form.
Beforehand, you should have:
- A Brevo account
- Your Brevo API v3 key
- Administrator access to your WordPress dashboard
How to install the Brevo WooCommerce plugin
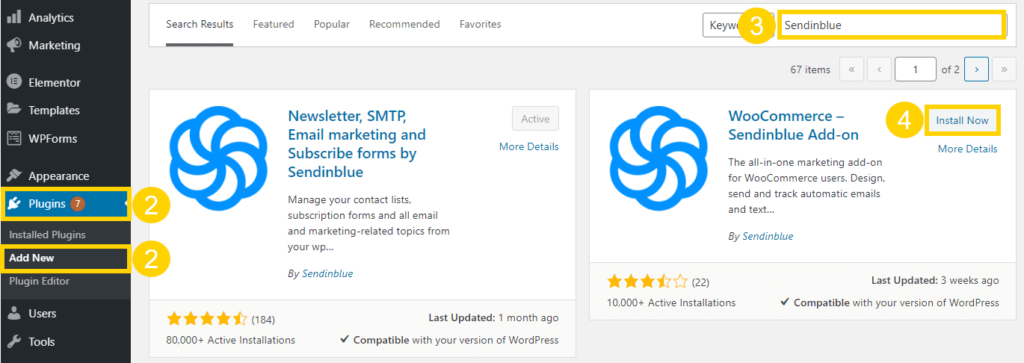
First, log into your WooCommerce dashboard as an admin. Next, go to Plugins > Add New in the sidebar menu.
Search for “Brevo” and click Install Now, then Activate.

How to connect your website to Brevo
With the plugin successfully installed, you can connect your WooCommerce shop to Brevo.
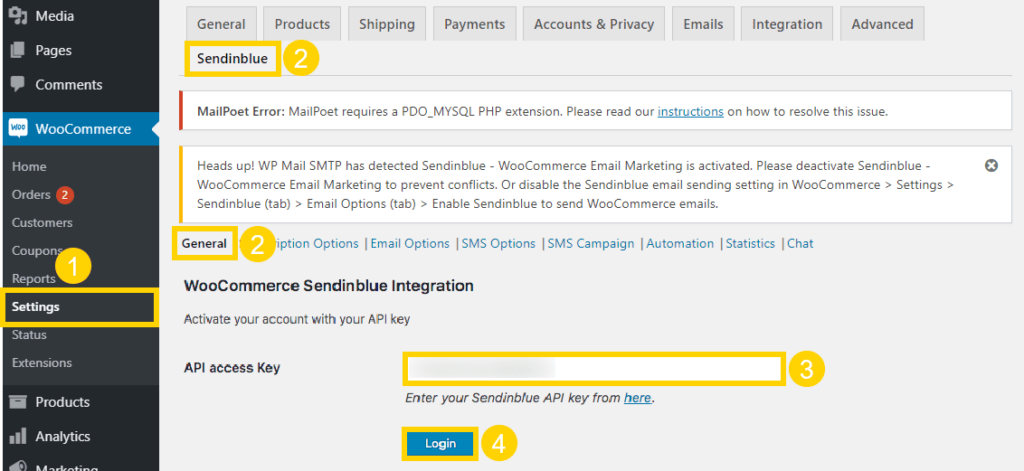
From the dashboard, find WooCommerce on the sidebar menu. Click Settings.
Then go to the Brevo tab, and choose General.
Enter your API v3 key in the field labeled “API access key.” To find your API key in Brevo, follow these instructions.
Click Login.

And that’s it — you’ve successfully connected your Brevo and WooCommerce accounts!
How to synchronize your contacts
Once you set up a signup form for your checkout page, your new subscribers will be automatically added to your Brevo account. To import your existing WooCommerce contacts into Brevo, follow these steps.
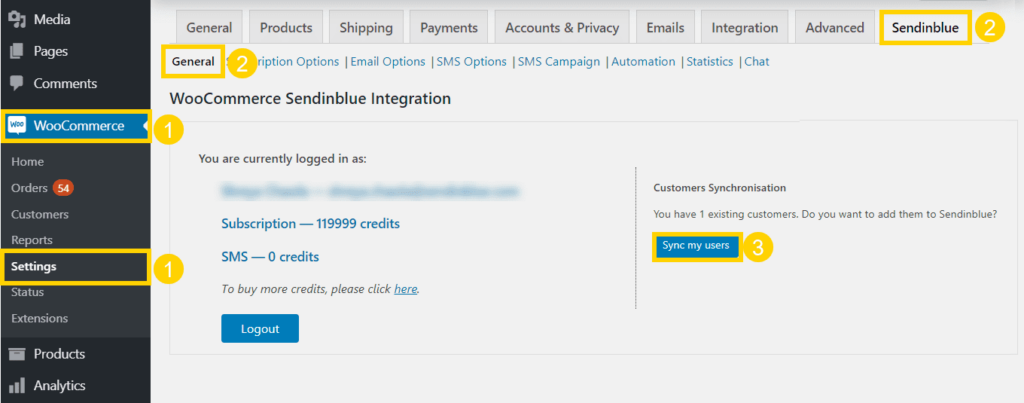
Go to WooCommerce > Settings in the sidebar menu.
In the Brevo tab, click General. Then, click Sync my users.

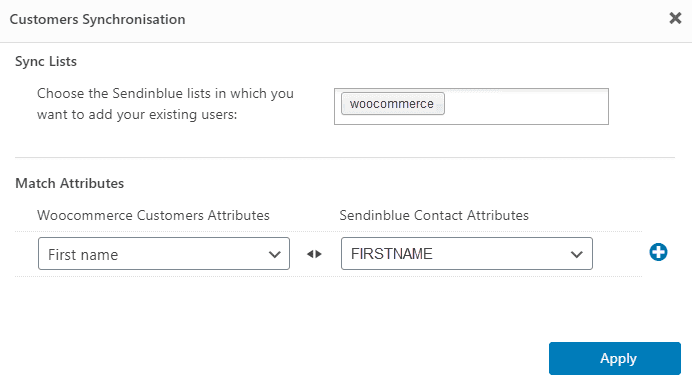
Here, you can select which Brevo lists to add your contacts to and which attributes to sync.
Click Apply.

How to add an email signup form to your WooCommerce checkout page
From the sidebar menu, go to WooCommerce > Settings.
Choose the Brevo tab and go to Subscription Options.
Manage your subscription options:
- Enable/Disable: Select Enable Subscription to be able to add contacts from WooCommerce to Brevo.
- Subscribe Event: Choose what event will trigger the signup form (order created or completed).
- Lists: Choose which lists your new subscribers will be added to in Brevo.
- Match Attributes: Check the Enable Match Attributes option to ask new contacts for the same information as the rest of your forms.
-
Double Opt-In: Enable double opt-in for a more secure signup process and better deliverability in the long run.
- Double Opt-In Template: Select the double opt-in confirmation template you want to send new subscribers. You can customize the template from your Brevo account.
-
Double Opt-In Field: Select the Display an Opt-In Field at Checkout option to give customers the chance to sign up at checkout.
- Opt-In Field Label: Write the text for the checkbox label included on the form.
- Opt-In Checkbox Default Status: Choose whether the opt-in box is pre-checked or not. Note: GDPR requires this box to be unchecked.
- Opt-In Checkbox Display Location: Choose where you want the form to be displayed on your checkout page (under order information, billing info, or terms and conditions).
Once you’ve gone through these steps, your signup form is ready to collect new subscribers from your WooCommerce store! Your next step is in Brevo — create your newsletters quickly and easily thanks to the drag-and-drop editor and our free email templates!
Check out these articles to learn more about customizing your signup form, using email templates, and sending newsletters:
- Tutorial: How to Create an Email Signup Form in 6 Easy Steps
- 20 Newsletter Signup Examples to Take Inspiration From
- How to Create a Newsletter in 9 Easy Steps (Completely Free)
Send your own WooCommerce newsletter today
There you have it folks — everything you need to set up WooCommerce newsletter subscriptions! Get started today sending professional newsletters to customers on WooCommerce and watch your customer base and revenues grow.
Open a free Brevo account and get access to all core email features to support your ecommerce business.


